1. There is an AlphOmega Consolidation/Triangle warning indicator. This indicator attempts warning the user that the security is entering a consolidation phase. This indicator is also in the Expert. The indicator is a binary type, it only has a value of 0 or 1.
2. The AlphOmega Highlighter is a price projection accounting for the rules of alternance and similarity from Elliott. Simply put, it will look back for extended waves in the pattern; if one is already present, it will assume the alternate wave will not be extended. This indicator is automatic and it is set to work with a set sensitivity only, so use the appropriate one (the sensitivity is in brackets beside the indicator name).
3. The AlphOmega Similarity of a Wave is an indicator to measure how a wave matches the expected pattern according to the rules of alternance and similarity from Elliott. It also defines the expected range for the present wave. The rule of similarity and alternance of wave states that often wave 1 will be the same length as wave 5, if wave 2 is made of a zigzag, then wave 4 will be more complex like a triangular pattern. All our projection tools account for that but when we are looking at an incomplete pattern, it is good to know the expected sub pattern and if confirmed, we can place orders faster to ride the completion of the pattern.
The number of lines displayed should not rebuke us, the dotted lines correspond to the slope of the previous impulse or correction and the same slope times a safety factor user defined. The solid lines (dark green and dark red) are the cumulative linear regression of a user defined period; the green is the pure LR while the red is the green times a safety factor that is user defined. Basically we are not concerned as long as the price is between the 2 solid lines; when it penetrates the dark red or it is always close to the dotted dark red, it has lost too much momentum to stay with the trade.
The bars until the trigger shows are not meaningful, we can discount them. When we apply this indicator, all the lines are identical in color and style; to sort them out, we should assign colors and style similar to the above picture. To do this, select with the cursor the first straight section of a line that is the furthest away from the price, use the dotted style and dark red for the color. Then pick the next straight section closer to the price, select dotted style and dark green for color. Within the same wave, pick the line that is closest to the one we just set, make it dark red and select a thicker line set. Finally we complete with the last line to make it dark green and thicker.
4. There are indicators that are similar to those used by Advanced Get® such as XTL-Ag which will indicate trend extension in the expert under the Highlights tab, AO PTI that provides a probability of a wave 4 to be followed by a wave 5, AO W4 TRC that displays limits for the retracement of a wave 4. All are on a template named AlphOmega Aget. The template AOi Aget is similar but with the corresponding intra day indicators. What is special with those 2 templates is that they are set to trade Tom Joseph T1 and T2 setups as detailed in the annex at the end of this book.
The indicators are named partially as the popular, good but expensive Elliott Waves software that Tom Joseph marketed. Since their indicators are proprietary, we created with our own code indicators that use the same theory to compute the desired value. As we never owned nor had access to this program, our indicators can plot a slightly different course. Our goal was not to duplicate exactly the proprietary indicators but to open access to the mathematical theory behind them. Of course our indicators are adapted to our own wave definition and measurement.
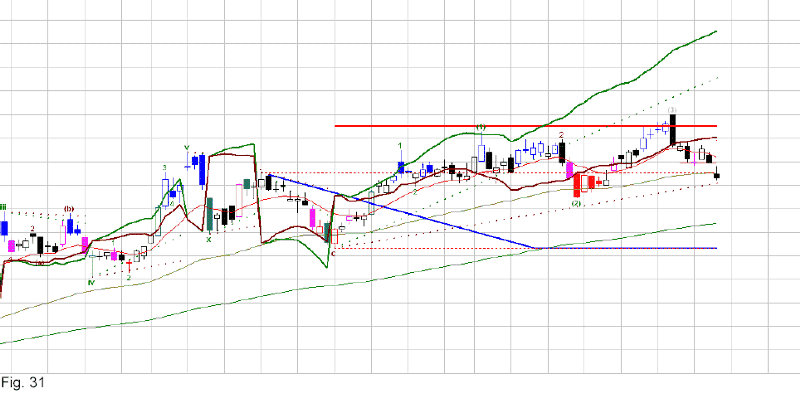
Fig. 32 AlphOmega AGet Template
This template will display T1 indicators only if the current wave of the selected sensitivity is a wave 4; it will display T2 indicators if the current wave of the selected sensitivity is a wave 5. The indicators specific to this template are: AO DMA the displaced moving average. The displacement is user defined and the line is a thick blue. AO W4 TRC is the Trend Ranging Channel that plots the 3 possible reversal points for a wave 4 factoring the time in the calculation. The display is like 3 dotted lines, red, green and blue. AO Elliott Channels(W3W4) or AO Elliott Channels(W5) is the purple channel that should contain the price while the wave deploys. Only a change in volatility will make the price stray from the channel.
AO Elliott W5 Target is the most likely target for wave 5, after the correction should start opening the possibility for a T2 setup. AO PTI is the Profit Taking Index that computes the momentum built during wave 3 and compares with the wasted momentum from wave 4. The remainder is an index that should not fall below 35 to have a good probability for a wave 5. The T1 setup is projecting the point of reversal of the wave 4 to get to trade the wave 5 as soon as it starts. The T2 setup is the next logical step of T1, that is project the point of reversal of wave 5 to get to trade the whole correction (waves ABC) as soon as it starts. See the annex at the end of this book for a detailed explanation.
Note: For your convenience, indicators having the prefix AO are listed in Appendix – 2 with their graph. They are all related to Waves in one way or another. The required inputs are outlined clearly when you insert them in your chart and their use and interpretation is generally simple if not obvious. The most important one is the AO ZZ that will display the Zig Zag of the peak of high and trough of low. Many of the indicators in the AO category have the “auto” label meaning that once laid on a chart, they will update as the data comes in.
Where the name has a “(P)” added to the end, it must be used on the price plot and displayed as a histogram without scale. This will enable the display of vertical lines!! Some indicators refer to P, no brackets, in their name. This is the P function from MetaStock® that refers to any indicator that you click on a chart. AlphOmega uses the P function to allow you to apply AlphOmega indicators over the variable you pick on the active chart. Usually you just have to drag the indicator from the list to the chart plotted variable and release the mouse button. If there is a required input, a text box will appear to request the missing parameters.
TIP: Of all the indicators provided with the set, only a few should not be displayed in your indicator quick list. All ID’s indicators belong to that category as well as the system’s, the PW’s and the TW’s. The Wave Projection and the Time Projection are inserted in layouts and can be ticked off the quick list. DO NOT ERASE ANY OF THEM!!!
Next: Zigzag Dynamics
Summary: Index