All the tools in this set can be duplicated, then modified to suit our own need or preference. We can even extract portions of formulas to create our own indicators, experts, explorations or systems. The easy way to create our own indicators is by referring to AlphOmega indicators through the formula call and formula variable call functions of MetaStock® language.
A list of the available indicators will appear when we use the Function button in the programming of indicators, systems, experts or explorations. All the AlphOmega variables that can be used are labelled with the company name or abbreviation AO so we can recognize them through the list. Indicators that have names like “PW2” or “TW3” or “IDf” or the likes should not be used as they refer to formulas that do not return a usable variable. To understand what the variables refer to is of prime importance to generate code that is meaningful to us. The most important variable in Elliott Waves is the “ID” variable. It is different from “IDf” that is a formula name.
The “ID” variable is the wave number as identified in the formula. The sensitivity involved is indicated in the name of the formula such as “f” for the “IDf” that corresponds to 8%. “Trig” is another important variable because it tells you when the wave is recognized by MetaStock®. It is the threshold price that must be crossed before the wave takes a name. The general purpose of these tools is to entice people in building their own trading system using Elliott Waves as a building block. At the end of this document, is a list of the variables you can use and a short description.
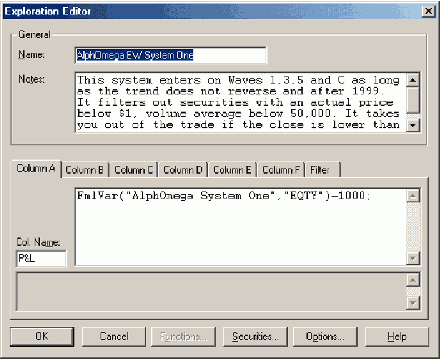
Fig. 23
This is snippet of the code used in one of the system explorations no longer in use. As you can see the formula calls for a variable that we can see when we open the function window in design or edit mode. The names that are used by AlphOmega are mnemonics and we should easily guess their meaning. If in doubt, just e-mail your question and we will answer promptly. As we get more familiar with the set, we have preferred indicators that are used in specific cases where we need to enter our personal parameters.
This is an ideal project to start implementing our own formulas. A safe way is first to copy the indicator we want to modify and save it under a name that AlphOmega will not overwrite in the update process (avoid using AO or AlphOmega). Once the indicator is saved, we can modify to our heart’s content the code to suit our needs; initially we will deal with small modifications like altering the default input parameters so we don’t need to input our settings each time we use it.
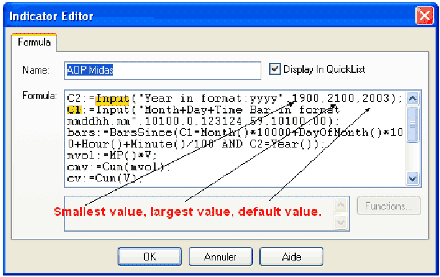
Fig. 24
In the example above, we have the parameters for 2 variables that require a user input, C2 and C1. The key word for an input parameter is Input. Then we have three values that drive how the dialog box will request the information. The first 2 control the range within with the user can enter his value (all outside value will produce an error message to the user), the 3rd value is the default value that appears in the dialog box when prompting the user.
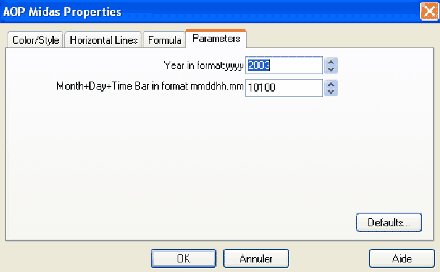
Fig. 25
This is a view of the dialog box produced by the above code. We see the 2003 that is our default value beside the text we chose to prompt the user. It is as easy as described so next year we can change the default value to 2004 instead of 2003. This process for editing formulas applies to experts, explorations, systems and indicators. Templates are merely a collection of expert, indicators and chart settings so that when called it displays precisely the way we want. What is the difference between experts, explorations, systems and indicators?
Experts are responsible for the labels displayed on your chart and the color of the bars; additionally they can display a commentary, a ribbon and a corner indicator. They summarize the information of many indicators providing a readable format and serve as a reminder of things we tend to forget in an overall evaluation. They evaluate a lay out for all bars up to the point they are summoned, ignoring the data after the summon point; this feature is as valuable as back testing.
Indicators will display lines on your chart whether straight or irregular, horizontal or vertical. Indicators can have calculated variables, user input variables, constants, display only under certain conditions. They are the backbone of charting software as we can test all the formulas making up experts, explorations, systems or indicators, first as an indicator to verify their proper functioning and display properties.
Explorations are the trading source and selection center for candidates. Although they never show on a chart, they reproduce in the database what the indicators do on a chart. Sometimes they can be substituted for a system test although this was useful only with the prior MetaStock® version (7.2 and lower). They perform all the screening operations acting as a filter for low traded volume and low priced securities.
System Tests are providing the back testing capabilities necessary to implement a trading system. In the report are grouped all the essential information on the trades, their efficiency, the required capital and drawdown, the entries and exits for each trade, statistics on the system tested as well as a comparison with a buy and keep for long term trade.
A chapter will be devoted to each of these topics later in the book.
Next: Trend Lines and Other Indicators
Summary: Index