A trigger is the bar where the price has retraced the set percentage of sensitivity or more. From that point, a wave is confirmed and it will end when the price crosses a trigger in the opposite direction. Triggers are confirmation signals and can be used as entry or exit signals. This is the slowest but the most reliable signal we will get from the system in Elliott Waves as far as waves are concerned. Other signals like trend lines and moving averages are not wave specific. There are faster signals that are wave specific such as the price and time projections, Elliott oscillator when adjusted for the wave sensitivity monitored and AO (Trig) that will give you the price to be reached for a confirmation.
Trigger is the most important concept in this set of Elliott wave’s tools. The chosen method to display this important signal is the expert highlights that colors the elected bar with a user specified color. We did not use a symbol like for the wave labels because it would conflict with some of the smaller wave labels.
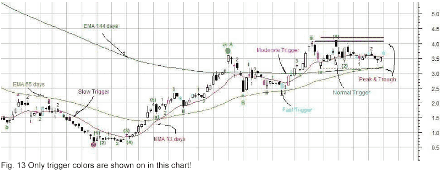
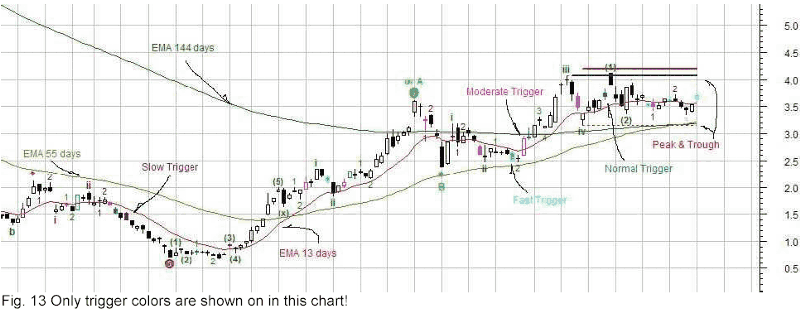
Looking at the figure 13, you will observe that bars take on a different color from time to time. These colors have a meaning that will flag you the important bars. First, let us look at the bar signal for the trigger of the wave. The trigger as mentioned above is the point where the wave indicator acknowledges that the previous wave has ended and the next one is underway (In other words, the peak or trough is not dynamic anymore, it is set!); to activate the trigger, the data array selected must make a peak or a trough and retrace a percentage called the sensitivity.
The trigger codes are:
• 8% sensitivity, called fast, is coloured cyan
• 13% sensitivity is coloured magenta
• 21% sensitivity is coloured dark cyan
• 34% sensitivity is coloured dark magenta
Many other patterns are available with the expert; all you have to do is to check the box in the Highlights tab to enable or disable them. An exaggerated use of these will only confuse the interpretation of the chart. When several bars take on coloration, we are looking at a trend developing. Depending on the version you have, the blue color is used for a bullish trend while the red means a bearish trend; gray is used for consolidation patterns and orange for failing wave 4.
Nomenclature Used
Throughout the experts, color and style codes have been used to provide a visual key in the chart. Wave labels:
• Bullish pattern including all of its waves 1 to 5, will be coloured green and bearish will be red.
• The sensitivity will be indicated by using a different font or presentation for the numbers:
o Fast (8%) sensitivity will use small numbers 1, 2, 3, 4, 5, a, b, c
o Moderate (13%) sensitivity will use small bracketed numbers (1), (2), (3), (4), (5), (a), (b), (c),(d),(e)
o Normal (21%) sensitivity will use bold roman numbers i, ii, iii, iv, v, a, b, c,d,e
o Slow (34%) sensitivity will use a combination of symbols and bold capital letters and circled numbers 1, 2, 3, 4, 5, A, B, C,D,E
The high volatility (HV) expert uses the similar notation inserting bracketed bold roman numbers (i), (ii), (iii), (iv),(v), (a), (b), (c), (d) and (e) as the slow (34%) sensitivity, the combination of symbols and bold capital letters and circled numbers for the very slow (55%) sensitivity.
TIP: There is a recommendation about the scale to be used for the price indicator. In Elliott Wave’s analysis, the moves are easier to study using a semi-logarithmic scale. This enables you to see the patterns with the price acceleration accounted for; the Fibonacci projections look more appropriate and fit the scale without compressing the price data in a tiny line. The drawback to this scale is that less information points are available; it becomes very difficult to see price without using the pointer to actually display it. You can make yourself a template for the semi-log scale so that when required you just open it.
Another alternative is to right click on the scale and select semi-log. If you move to another security without changing back the scale, the previous security will open in semi-log for the next session while the next one in this session, will open with normal scale. For this reason, we opted to stay with the normal scale while we are aware that the semi-logarithmic is preferable. While we could add a template, it would be difficult to manage the number of icons you want to display as well as how many you can remember. So you have the option and it is easy to do!
Next: Indicators Using Date & Time Input
Summary: Index